Documentation: Solution Organizer
Solution Organizer by DoubleSpark Entertainment organizes your solutions and reduces clutter in your projects. Read the full documentation in this article.
Features
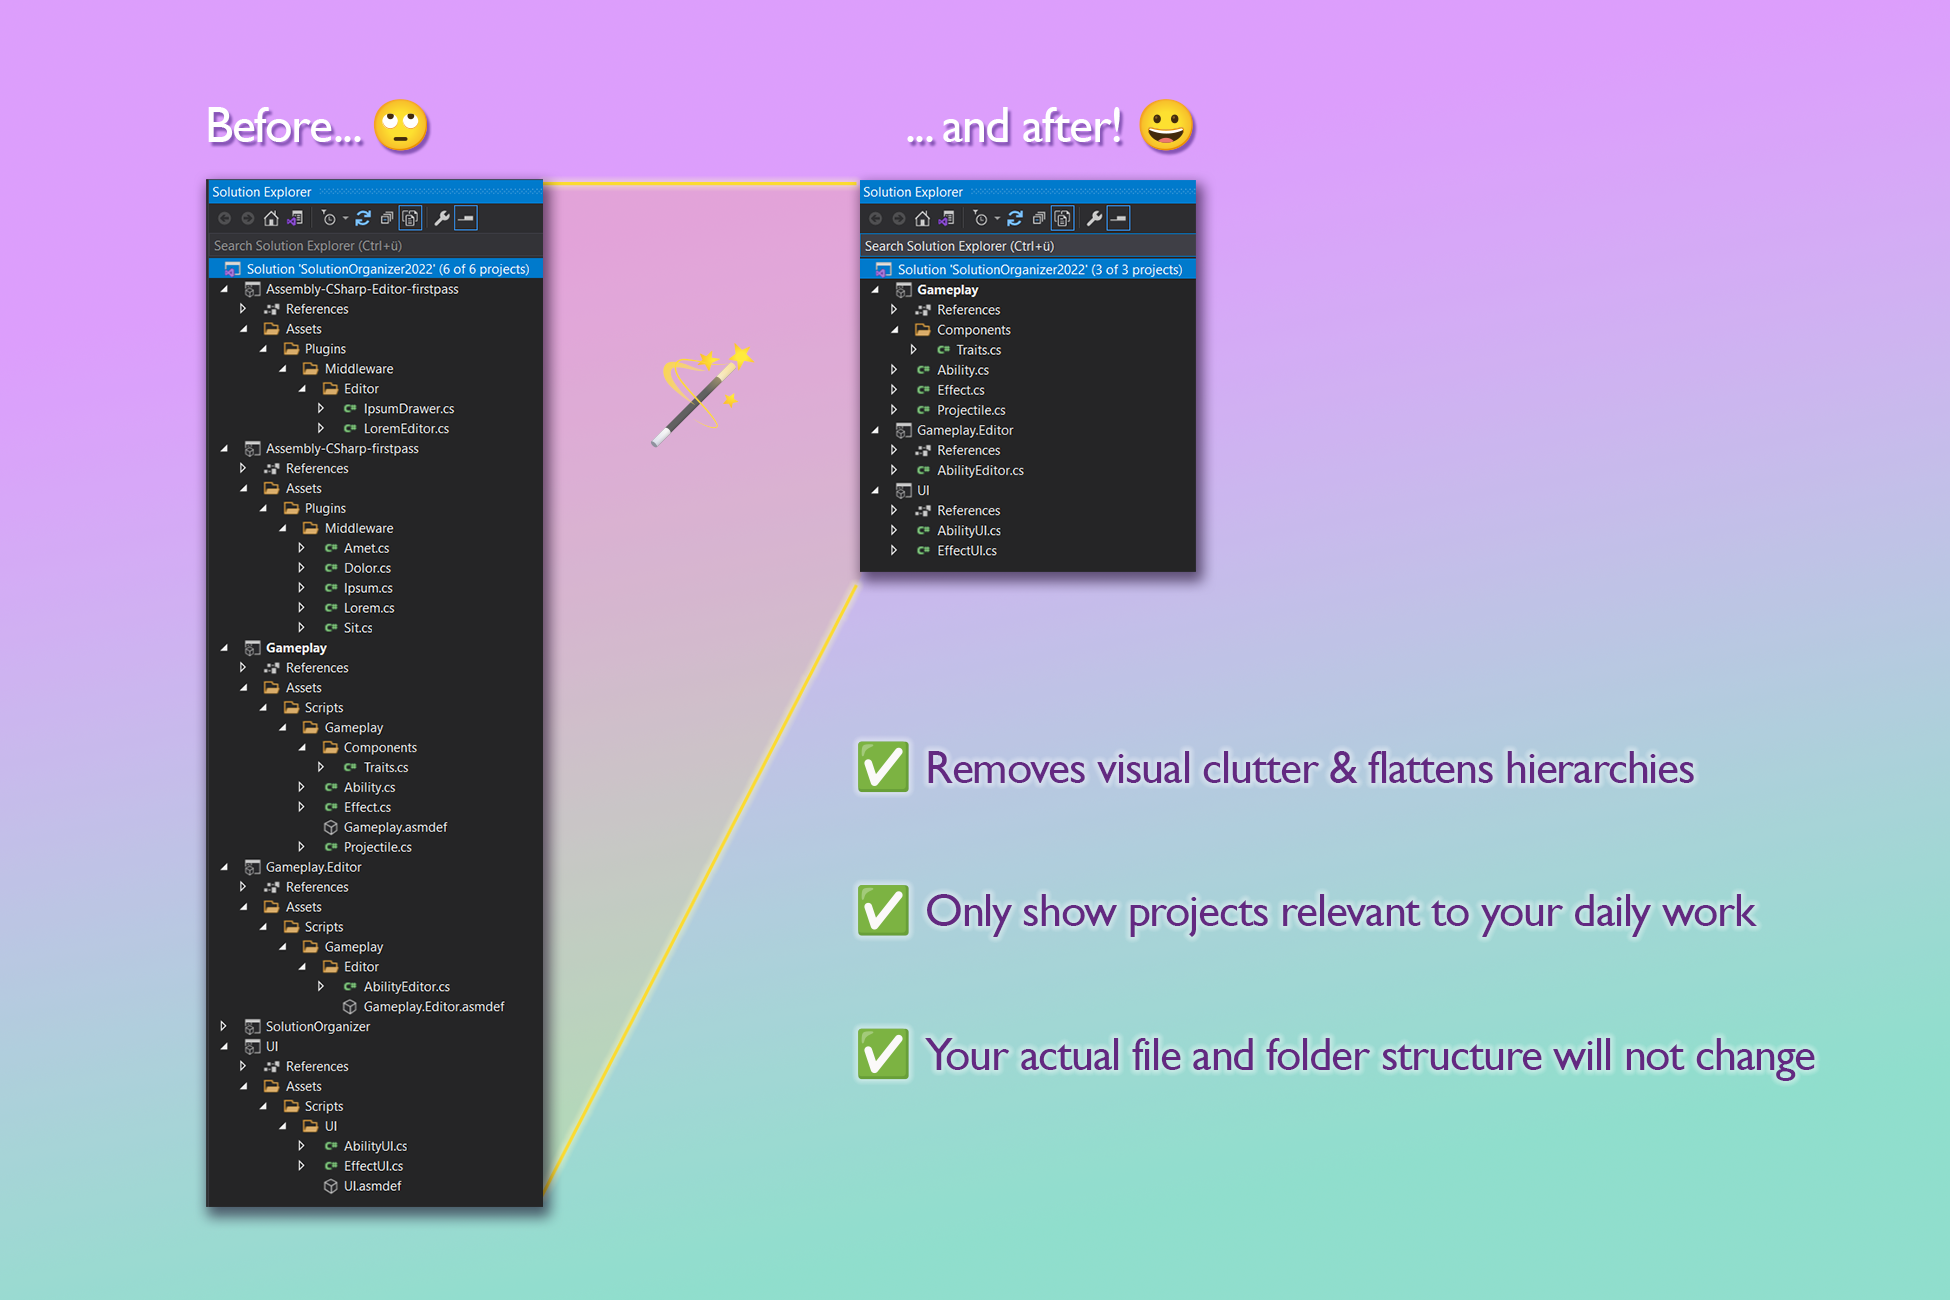
- Solution Organizer automatically moves your Visual Studio project files to the actual code folders. This way your code files will be placed directly at the root in the Solution Explorer – you won’t have to open several folders anymore in order to find them.
- Removes projects from your solution file that you don’t need in your daily work to remove visual clutter from the Solution Explorer and speed up Visual Studio loading and reloading times.
- Removes files with specific extensions from your project files to reduce clutter even further.
- Easy compiler option management via csc.rsp files – specify warnings to ignore globally or for specific projects and treat warnings as errors to improve your code quality.
- Remove unneeded project references to enforce your dependency modeling.
Prerequisites
- IDE: Visual Studio 2019 & 2022, Visual Studio Code 1.90 (get the Solution Explorer via C# Dev Kit) and Rider 2024.1. Older versions will likely work too. "Visual Studio for Mac" is not supported.
- OS: Confirmed working on Windows and macOS.
- Unity: 2020.3 or higher
- Please make sure to not check in.sln or .csproj files to your version control system.
- Solution Organizer works best in projects that make use of assembly definitions.
Installation
Solution Organizer is installed like any other asset:
- Open the Unity Editor
- Open the package manager by clicking on Window -> Package Manager
- On the top left it should say „Packages: Unity Registry“. Click on it and select „My Assets“.
- Now search the list for Solution Organizer and select it.
- Hit „Download“ on the top right and then „Import“ once the download has completed.
- The import window opens, hit the „Import“ button on the bottom right.
- Once imported, a new „Solution Organizer“ Menu entry will appear under Tools. Click on “Open Settings” to get started. This will open up the project settings.
Uninstallation
- Optional: If you want the generated files to be automatically deleted, uncheck the Enabled setting and hit the Update Solution button.
- Remove the Solution Organizer folder inside Assets/Plugins.
Settings
Once you have opened Solution Organizer settings, you should see see something similar to the following image:
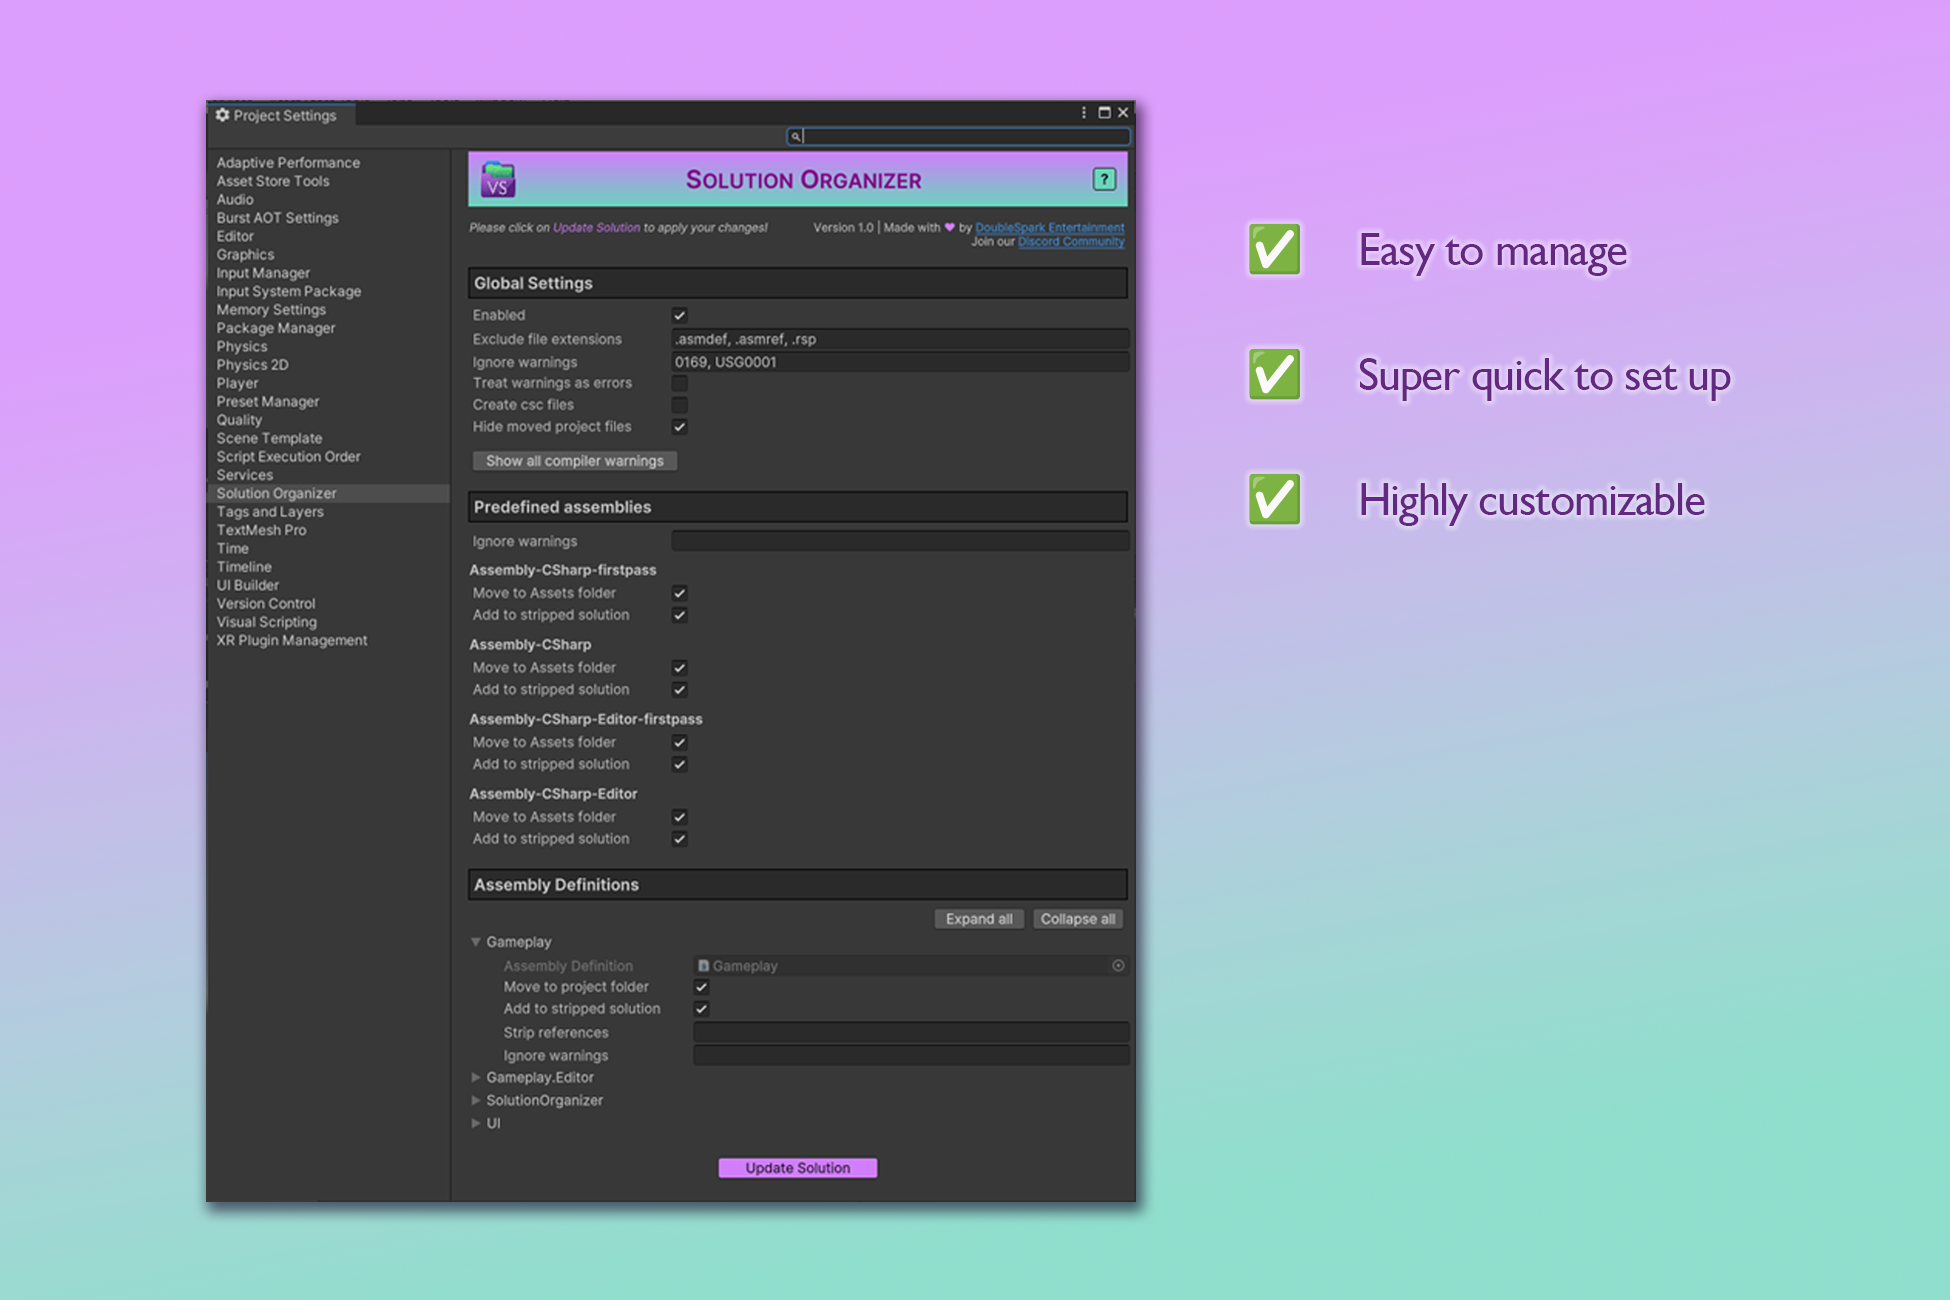
Global Settings
Enabled
When you uncheck this box, Solution Organizer will behave as if he was not installed. When hitting “Update Solution” you will be prompted to delete any generated files. They will be regenerated automatically in the Unity default format. This is a safe operation, however, please make sure to double-check the displayed list of files.
Exclude file extensions
Unity usually includes some unneeded files to the project files that clutter the Solution Explorer. With this setting you can exclude these files by adding their file-extension to the textfield. Multiple entries are separated by a comma. By default Solution Organizer excludes .asmdef, .asmref and .rsp files.
Ignore warnings
With this setting you can tell the compiler to ignore specific warnings in all project files. Multiple entries are separated by a comma. Hit the “Show all compiler warnings” button to see a list of all warnings.
💡 Try to keep this list small to improve your code quality.
Treat warnings as errors
When enabled, any non-ignored warnings will result in a compilation error.
💡 We highly recommend enabling this setting to improve your code quality. If there are any warnings that you generally don’t care about, simply add them to “Ignore warnings”. However, sometimes third-party assets trigger warnings that you might not want to fix – in that case add these warnings just to the ignore list of the specific assembly that triggers them (see below).
Create csc files
By default the warning settings only apply to Visual Studio, not the Unity Editor. When this setting is enabled, Solution Organizer creates csc.rsp files for all assemblies. Through these files, the Unity Editor will behave the same as VS. When you hit “Update Solution” after disabling the setting, you will be prompted to delete any csc.rsp files. This is a safe operation, however, please make sure to double-check the displayed list of files.
⚠️ When enabling the setting any existing csc.rsp files will be overwritten. For this reason all assemblies will show an extra setting “Additional csc arguments” whose contents will be added to the automatically generated files.
💡 We highly recommend enabling this setting. It is only disabled by default so new users are not confused by the generated files.
Hide moved project files
When this setting is enabled, all moved project files will have a “.” prefixed to their filenames. This way the files won’t show up in the Unity Project window. There is only a small downside – the “.” will also be visible in the project names in the Solution Explorer. When hitting “Update Solution” after changing this setting, you will be prompted to delete any generated files. They will be regenerated automatically. This is a safe operation, however, please make sure to double-check the displayed list of files.
Predefined Assemblies
If you have any code files that are not managed through an assembly definition (asmdef) these may be added to one of four predefined assemblies.
Here you can find more information on these assemblies: docs.unity3d.com
Ignore warnings
With this setting you can tell the compiler to ignore specific warnings just for the predefined assemblies. Multiple entries are separated by a comma.
Additional csc arguments
Only displayed if Create csc files is enabled. Solution Organizer overwrites any manual changes to csc files, so place any additional content for the files here instead. Multiple entries are separated by a comma.
💡 This is a setting for special use cases, mostly for referencing additional assemblies: docs.unity3d.com. Leaving the field empty is absolutely fine.
Move to Assets folder
Enabling this will cause the project files to be created inside the assets folder instead of your project root. It’s not much but this way there is one less folder to open in the Solution Explorer hierarchy. Files of predefined assemblies can basically have any path inside your project so it’s not possible to further reduce the hierarchy.
Add to stripped solution
Once Solution Organizer is installed, you work with a stripped solution file by default. Stripped means that you can remove any projects from the solution which are not relevant in your daily work. By default all projects are still present in this stripped solution – uncheck this option to remove a specific project.
💡 For convenience Solution Explorer creates a second solution in your project root that still contains all project files. You can open it at any time by clicking on
“Tools -> Solution Explorer-> Open <ProjectName>All.sln”
💡 If you follow our recommendation below to use assembly definitions everywhere, no predefined assemblies will be generated, hence also no project files. Leave this setting enabled nonetheless, in order to notice directly when an assembly definition is missing somewhere.
Assembly Definitions
In order to use Solution Explorer to its fullest potential we recommend to use assembly definitions (asmdef) everywhere, even for 3rd party assets that don’t automatically come with them. This will also have the positive side effect of improved compilation speed and clear dependency modeling.
Any asmdefs in your Unity project will automatically be added to the assembly definitions list in the Solution Organizer settings. Here you can specify individual settings for the project files that are created for them.
💡 Asmdef creation quickstart: Every asmdef will cause an individual project to be created in your solution file. Any files inside the same folder as the asmdef and subfolders will be added to that project (unless a subfolder contains its own asmdef). To add an asmdef…
· Navigate to respective code folder in the Unity project window
· Right-click -> Create -> Assembly Definition and give it a sensible name.
· If the code has an Editor-Subfolder you need to create another asmdef there, make sure only “Editor” is enabled under “Platforms” and add the former asmdef under “Assembly References”.
· If the code still doesn’t compile, you need to check the ”using”s of the offending code an add a reference to the appropriate asmdefs – often references to Unity packages are needed.
· Here you can find more information: docs.unity3d.com
Move to project folder
This setting behaves the same as Move to Assets folder (Predefined Assemblies). The only difference is, that the project file will be created directly inside the folder of the asmdef, so you can directly see all code files without having to open any folders. Only files in subfolders of the asmdef will still be displayed inside a folder.
💡 We recommend to enable this setting, it is one of the core features.
Add to stripped solution
See Add to stripped solution (Predefined Assemblies).
Strip references
Unity adds a lot of unnecessary references to the generated projects, even if asdmef-settings such as “No Engine References” are enabled. This defeats the purpose of clear dependency modeling. With this field you can remove any automatically added references. Multiple entries are separated by a comma. Entries will be compared via string-contains.
💡 This is a setting for special use cases, leaving the field empty is absolutely fine.
Ignore warnings
With this setting you can tell the compiler to ignore specific warnings just for this assembly. Multiple entries are separated by a comma.
Additional csc arguments
See Additional csc arguments (Predefined Assemblies).
Update Solution button
Once you are done updating the settings, make sure to hit the button at the bottom. This will immediately apply the changes to your .sln, .csproj and .csp files. After changing certain settings you will be prompted to delete previously generated files. They will automatically be regenerated. This is a safe operation, however, please make sure to double-check the displayed list of files.
FAQ
Does Solution Organizer change my file or folder structure?
No, the plugin will not move or change any of your files or folders other than the automatically created .csproj and .sln files (and csp.rsp files if you enabled the setting).
My Solution fails to load some projects or displays errors. What can I do?
This can happen in rare cases such as when upgrading Unity or changing a lot of assembly definitions. Click on Tools -> Solution Organizer -> Recreate .csproj, .sln and csc.rsp files. You will be prompted about some file deletions. This is usually a safe operation but make sure to double-check the displayed list of files. Afterwards the files will be recreated.
If this doesn’t help, you might want to reset your Solution Organizer settings: Head over to “Assets/Plugins/SolutionOrganizer/Resources” and delete “SolutionOrganizerSettings.asset”. It will be automatically recreated with the default values.
Please contact us via discord or e-mail if this doesn’t resolve your issue and attach the output of your console window.
Why use csc.rsp files instead the “Additional Compiler Arguments” player setting?
The Additional Compiler Arguments setting can be used to do everything we do via csc.rsp files (such as ignoring specific warnings). However, this setting only works globally. The csc.rsp files give us the flexbility to add asmdef-specific settings.
Are assembly reference files (asmref) supported?
Yes, as long as they are placed in a subfolder of the linked asmdef file. There are two limitations if they are placed outside the asmdef hierarchy:
- If “Move to project folder” is enabled for the asmdef, all code files associated with the asmref will be placed as links in the project root, independent of any actual folders they might be in.
- The asmref won’t have it’s own csc file. You will need to manually copy the csc file from the asmdef folder to the asmref folder every time it is updated.